


Mục lục
Cách 1. Dùng tool WinProdKeyFinder
Bước 1: Bạn tải về tool xem Product key từ GitHub tại https://github.com/mrpeardotnet/WinProdKeyFinder/releases
Bạn click vào file .zip để tải về.
Bạn đang đọc: Cách xem Product Key trên Windows 10

Bước 2: Bạn giải nén và click vào thư mục (1) => mở ứng dụng WinProdKeyFind (2).

Sau đó thì mã bản quyền trên máy tính của bạn sẽ hiển thị lên .

Cách 2. Sử dụng Command Prompt
Bước 1: Bạn vào Search (1) => tìm cmd (2) => Run as administrator (3).

Bước 2: Bạn nhập lệnh sau và ấn Enter.
wmic path softwarelicensingservice get OA3xOriginalProductKey

Sau đó thì mã key bản quyền Windows của bạn sẽ hiển thị ở phần bên dưới lệnh .

Cách 3. Sử dụng mã VBS để xem key
Bước 1: Bạn click chuột phải vào Desktop => chọn New (1) => Text Document (2).

Bước 2: Bạn chép đoạn mã sau vào Notepad.
Set WshShell = CreateObject("WScript.Shell")
MsgBox ConvertToKey(WshShell.RegRead("HKLM\SOFTWARE\Microsoft\Windows NT\CurrentVersion\DigitalProductId"))
Function ConvertToKey(Key)
Const KeyOffset = 52
i = 28
Chars = "BCDFGHJKMPQRTVWXY2346789"
Do
Cur = 0
x = 14
Do
Cur = Cur * 256
Cur = Key(x + KeyOffset) + Cur
Key(x + KeyOffset) = (Cur \ 24) And 255
Cur = Cur Mod 24
x = x -1
Loop While x >= 0
i = i -1
KeyOutput = Mid(Chars, Cur + 1, 1) & KeyOutput
If (((29 - i) Mod 6) = 0) And (i <> -1) Then
i = i -1
KeyOutput = "-" & KeyOutput
End If
Loop While i >= 0
ConvertToKey = KeyOutput
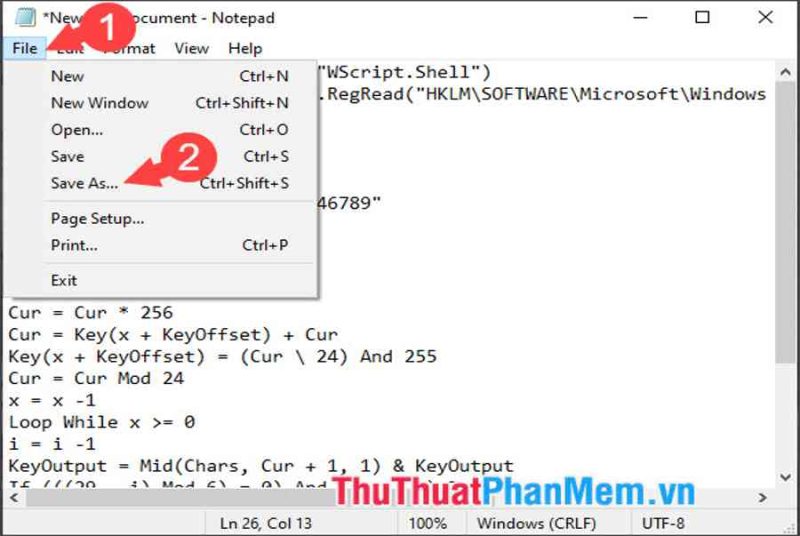
End FunctionTiếp theo, bạn click vào File (1) => Save As (2).

Bước 3: Chọn nơi lưu file (1) => thiết lập All files (2) => đặt tên file với phần mở rộng .vbs (3) => Save (4).

Bước 4: Bạn mở file vừa tạo và thông tin về mã Product key sẽ hiển thị trong popup.

Cách 4. Sử dụng lệnh thực thi trong Windows Power Shell
Bước 1: Bạn click chuột phải vào Desktop => New (1) => Text Document (2).

Bước 2: Bạn dán lệnh sau vào Notepad.
function Get-WindowsKey {
  ## function to retrieve the Windows Product Key from any PC
  ## by Jakob Bindslet ([email protected])
  param ($targets = ".")
  $hklm = 2147483650
  $regPath = "Software\Microsoft\Windows  NT\CurrentVersion"
  $regValue = "DigitalProductId"
  Foreach ($target in $targets) {
  $productKey = $null
  $win32os = $null
  $wmi =  [WMIClass]"\\$target\root\default:stdRegProv"
  $data = $wmi.GetBinaryValue($hklm,$regPath,$regValue)
  $binArray = ($data.uValue)[52..66]
  $charsArray =  "B","C","D","F","G","H","J","K","M","P","Q","R","T","V","W","X","Y","2","3","4","6","7","8","9"
  ## decrypt base24 encoded binary data
  For ($i = 24; $i -ge 0; $i--) {
  $k = 0
  For ($j = 14; $j -ge 0; $j--) {
  $k = $k * 256 -bxor $binArray[$j]
  $binArray[$j] = [math]::truncate($k / 24)
  $k = $k % 24
  }
  $productKey = $charsArray[$k] + $productKey
  If (($i % 5 -eq 0) -and ($i -ne 0)) {
  $productKey = "-" + $productKey
  }
  }
  $win32os = Get-WmiObject Win32_OperatingSystem -computer  $target
  $obj = New-Object Object
  $obj | Add-Member Noteproperty Computer -value $target
  $obj | Add-Member Noteproperty Caption -value  $win32os.Caption
  $obj | Add-Member Noteproperty CSDVersion -value  $win32os.CSDVersion
  $obj | Add-Member Noteproperty OSArch -value  $win32os.OSArchitecture
  $obj | Add-Member Noteproperty BuildNumber -value  $win32os.BuildNumber
  $obj | Add-Member Noteproperty RegisteredTo -value  $win32os.RegisteredUser
  $obj | Add-Member Noteproperty ProductID -value  $win32os.SerialNumber
  $obj | Add-Member Noteproperty ProductKey -value  $productkey
  $obj
  }
  }
Tiếp theo, bạn vào File (1) => Save As… (2).

Bước 3: Bạn chọn nơi lưu file (1) => chọn All Files (2) => đặt tên với phần mở rộng .ps1 (3) => Save (4).

Bước 4: Bạn click vào Search (1) => tìm kiếm từ khoá powers (2) => Run as administrator (3).

Bước 5: Bạn thực hiện lệnh sau và Enter.
Set-ExecutionPolicy RemoteSigned

Ấn Y để đồng ý thay đổi thiết lập.

Bước 6: Bạn click chuột phải vào file PowerShell (1) vừa tạo ở Bước 2,3 => Properties (2).

Tiếp theo, bạn ghi nhớ đường dẫn (3) và tên file (4) để chèn vào lệnh tiếp theo trong PowerShell.

Bước 7: Bạn quay lại PowerShell và thực hiện lệnh sau.
Import-Module < đường dẫn file > ; Get-WindowsKey
Với <đường dẫn file> là đường dẫn tới file mà bạn lấy ở Bước 6.

Bước 8: Sau khi thực hiện lệnh xong thì bạn có thể xem ProductKey hiển thị bên dưới.

Với hướng dẫn trong bài viết thì bạn hoàn toàn có thể kiểm tra key trên Windows 10 thuận tiện. Bạn hoàn toàn có thể triển khai những cách trên bài viết cho những phiên bản Windows cũ hơn như Windows 8.1 / 7 / Vista .
Source: https://expgg.vn
Category: Thông tin